Proper injection protocol and procedure is extremely important in regards to proper anatomical knowledge of where to inject steroids, how to inject steroids, and proper steroid sterility practice. What must be discussed and clarified first are the various myths, rumors, and truths in regards to the subject of steroid injections. There exist various myths in regards to how to inject steroids both among the general population as well as among the anabolic steroid using community itself. This article will begin with the most common myths among the general population, and work towards the myths among the anabolic steroid using community.
Myth: Steroid injections are administered intravenously (into the arm).
Fact: Wrong. This is a very common myth among the general populace that is uneducated in regards to how to inject steroids. Anabolic steroids are, for the most part, oil-based solutions (the hormone is suspended in oil) or water based preparations that contain microcrystals that contain the anabolic steroids (such as injectable Winstrol or Testosterone suspension). If either of these solutions is injected intravenously directly into an artery or vein, it would induce a pulmonary embolism specifically known as a pulmonary oil embolus. Dependent on the amount of oil injected, this can potentially result in myocardial infarction (heart attack). Anabolic steroids are designed to be injected intramuscularly (IM), into muscle tissue, not intravenously. See what happened in this medical case of a 21-year old man who injected an oil steroid intravenously.
Myth: If you inject the smallest amount of air into yourself, you will die.
Fact: Wrong. This is a common myth among the general populace as well as among the anabolic steroid using community (although to lesser degrees). This myth is referring to an air embolism. This myth originates from fictional movies in which an individual is injected with air bubbles, which travels to the brain and causes an aneurysm, killing the subject. It is a myth that is derived from fiction to the point where it could be said that anyone who expresses concern about this is “someone who watches too many movies”. The truth is that air bubbles in an injection will only be a concern if injected intravenously, and even in such cases, the requirement for a serious aneurysm is several CCs or mLs of air. Although not a regular occurrence and supported in medical practice, many anabolic steroid users leave a small amount of air at the bottom of the syringe (between the plunger and the oil) in order to push every last amount of solution out so as to ensure no amount is left behind that could not be pushed out of the syringe and wasted. In such cases, many have injected varying amounts of air into the muscle tissue of the injection site with no problems.
Myth: Anabolic steroids will cause muscular growth at the specific site of injection.
Fact: Wrong. Steroid injections do not provide localized site-specific growth under any circumstances with the exception of perhaps Testosterone suspension. Nearly all injectable anabolic steroids are esterified, which means there is a carboxylic acid of varying length that is chemically bonded to the anabolic steroid at the 17-beta hydroxyl group. This is known as esterification (or an ester bond), and the ester serves to extend the release rate and half-life of the hormone in the body. This occurs by way of enzymes breaking down the ester that is attached to the anabolic steroid. This occurs primarily in the liver, but also occurs in the bloodstream as well. The body must first break off the ester before the anabolic steroid hormone can be free in the body to do its job. By the time this occurs, the anabolic steroid has left the site of injection and is circulating systemically within the body. The result is that all anabolic steroids operate on a systemic basis according to the body’s needs, and not a localized site-specific basis. Testosterone suspension is an un-esterified form of Testosterone. Claims of injection site specific growth for these reasons should not be taken seriously.
Myth: If you inject anabolic steroids subcutaneously or if you don’t go deep enough into muscle tissue, you will get an abscess.
Fact: Wrong. Anabolic steroids can indeed be injected subcutaneously, although they are designed for intramuscular injection primarily. Steroid injections that utilize subcutaneous fat tissue as the deposit location will only alter the rate of release from the site, and even so it has not been determined to exhibit very much difference from intramuscular injections. Individuals looking to administer steroid injections subcutaneously should take care to ensure that smaller amounts should be utilized, as subcutaneous tissue cannot hold as much volume of oil injected without discomfort as intramuscular injections can. Details in regards to the effectiveness of subcutaneous injections will be covered shortly. In regards to the claims about abscesses, abscesses only occur if the injection site is infected. This is why learning how to inject steroids properly is paramount to your success.
Preliminary Considerations and Preparation
There are many considerations to be known prior to administering steroid injections. This includes the proper knowledge, proper preparatory supplies, proper sterility, and the proper environment. Inadequate preparation or ignorance of proper procedure and techniques can result in fatal outcomes, which include: inflammation, bacterial abscesses, and infections, development of scar tissue, septic shock, muscle damage, nerve damage, and injury. Improper sterility, such as the re-using of needles, sharing of needles, and sterilization of needles by way of exposure to flame or the wiping down of pins with alcohol (this should NEVER be done) will introduce the increased risks for the transmission of serious infectious diseases that are blood-borne such as HIV/AIDS and hepatitis. Proper needle disposal (pdf) is also imperative so as to limit the risk of injury, infection, and harm to others.
It is of the utmost importance that all proper procedures are followed, and that safety is of paramount concern for the individual engaging in steroid injections. The following points of consideration should be followed at all times:
- Be sure to have all necessary supplies (syringes, pins, alcohol swabs, etc.) prior to the start of any cycle. There is no excuse and it is unacceptable to not engage in proper pre-planning and acquire all of the necessary amounts of syringes, needles, and supplies prior to the beginning of a whole cycle. When this is not ensured, this is when the occurrence of dangerous practice rises (the re-using of syringes and needles).
- Be sure to have all necessary supplies (syringes, pins, alcohol swabs, etc.) prior to the start of the actual injection procedure.
- Inspect and ensure all syringes, pins, and alcohol swabs are hermetically sealed prior to use. These medical items are hermetically sealed to ensure complete sterility. The breaching of any packaging in the form of tears, rips, punctures, or opened packaging presents a risk of infection. Any items that have had their hermetic sealing breached in any way should be properly disposed of and not to be used under any circumstances.
- Never pre-load syringes prior to an injection. This is a common practice that should never be done, if only for a matter of 2 – 3 minutes. The pre-loading of syringes is a very dangerous practice, as there exist solvents and co-solvents (such as Benzyl Alcohol and Benzyl Benzoate) within the anabolic steroid solution that will slowly eat away at the plastics and rubber plunger and chemically melt them. Individuals who pre-load syringes for longer periods than 2 – 3 minutes risk injecting toxic plastic and rubber particulate matter that has dissolved into the oil or water solution into themselves. The result is a risk of infectious or sterile abscesses, alongside a myriad of other long-term health problems resultant of the plastic and rubber particulate injected.
Types of Steroid Injections
Intramuscular (IM) injections – This is the method of injection that anabolic steroids are intended for. This is an injection of an oil (most of the time) or water based preparation deep into muscle tissue in order to facilitate a steady release from the injection site into the bloodstream through the very small capillaries and veins. This is the standard method of injection for anabolic steroids among anabolic steroid users, as well as the medical establishment. Intramuscular injections typically allow far more volume of liquid to be injected into the site than any other method. Various muscles utilized as the injection site can tolerate upwards of 4 – 5 mL or CCs worth of oil or water. Most muscles can hold 2 – 3 mL or CCs worth of oil or water comfortably. IMPORTANT: intramuscular injection sites should be rotated so as to ensure no muscle is injected more than once every 7 – 14 days.
Subcutaneous (SQ) injections – This is an injection method that involves the injection of a (primarily) water-based solution into fat tissue just underneath the skin. Oil based solutions can be injected here too, but it is not normally recommended. Subcutaneous injections are reserved mostly for the administration of insulin, HGH (Human Growth Hormone), HCG (Human Chorionic Gonadotropin), and other peptides. Subcutaneous injections are used mostly with water-based substances, and substances that require very small amounts (1mL or CC or less), as subcutaneous injection sites cannot comfortably hold large amounts. Water based as well as oil based anabolic steroids can indeed be injected subcutaneously, but users must take care that their subcutaneous steroid injections involve far less volume of liquid than intramuscular injection sites. Studies have demonstrated that stable blood plasma levels of anabolic steroids following subcutaneous administration just as efficient as IM injections.
Different Syringes, Pins, and Supplies
Various terminology must first be understood for individuals unfamiliar with these types of medical supplies and equipment:
mL or CC: mL is an abbreviation for milliliter, and CC is an abbreviation for cubic centimeter. Both terms mean the same thing, both refer to the same thing, and both are the same things. 1mL = 1CC.
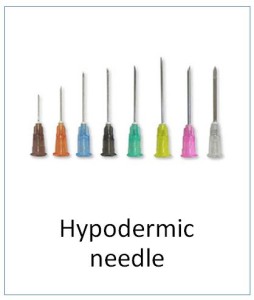
Gauge: Gauge refers to the thickness of the pin, or could also be described as the circumference of the tube that is at the center of the pin. This is to say that the higher the gauge number is, the thinner the pin is (and therefore the smaller the circumference of the tube). For example, a 19g pin is far thicker than a 25g pin, which is much thinner. Gauge does not refer to the length of the pin.
Length: The length of the pin refers to how long the pin is, and the two standard pin sizes utilized are 1” and 1.5” (also referred to as 1 and ½”). There exist all kinds of other sizes, including ½” pins (0.5”), 5/8” pins (0.625”), and so on and so forth.
The following is a list of the most common supplies encountered for steroid injections:
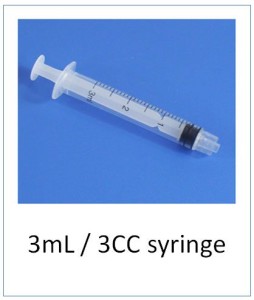
Although they come in different types and brands, 3mL syringes more or less all look the same and are generally the standard for intramuscular injection use. 3mL syringes can come pre-packaged with the needle attached, or also come packaged as just the syringe (barrel) itself.
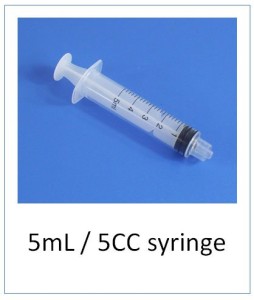
5mL syringes are exactly as described, and can contain up to 5mL worth of liquid. As with 3ml syringes, these too can come pre-packaged with the needle attached, or separately.
Hypodermic needles, as displayed above, come in varying degrees of gauges and lengths. For the purpose of injection procedure, there will be a specific range of gauges to be provided for both the actual injection as well as the withdrawal of solution from the vial prior to the injection
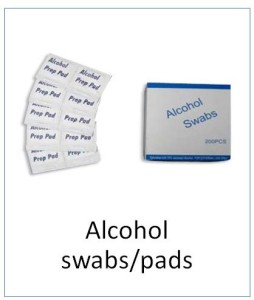
Alcohol swabs are essential for the obvious reason of sterility.
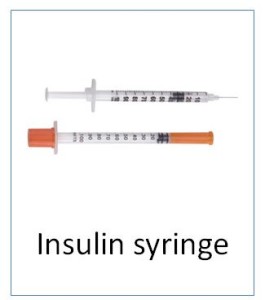
Insulin syringes are of a normal standard type, but can vary in terms of the needle length (shorter needle insulin syringes are known as “shorts”), and insulin syringes are normally one whole unit without the ability to un-screw the needle tip. They are specifically designed for subcutaneous administration and should not be utilized for intramuscular injections. Insulin syringes are always 1mL in volume and usually no larger than this.
Finally, the inclusion of Band-Aids and/or dry cotton balls with plastic bandages is recommended for the purpose of stopping any potential bleeding following an injection.
How to Inject Steroids – Intramuscular (IM) Procedure
It is optimal for an intramuscular injection to have in possession syringes without the tips (needles) already affixed to them. Preferably, the individual should have the hermetically sealed syringes (barrels) separate from the hermetically sealed needle tips. Although one can easily use syringes with the tips already affixed, it is slightly more complicated and adds an extra step or two into the process that otherwise would not be there. So, every individual should ensure to the best of their ability to have the syringe and needle tips separate.
Supplies Required:
1 – syringe (5mL or 3mL but preferably 3mL).- 1 – 22 to 25g needle that is 1 – 1.5” for injection administration into the body. Length of needle (1” or 1.5” is dependent on the muscle being injected – typically 1.5” is utilized only for the dorsogluteal site, while 1” is utilized for all others such as quadriceps, deltoids, etc.).
- 1 – 19 to 21g needle of any length for the withdrawal of solution from the vial. This is because a larger gauge will facilitate easier and quicker withdrawal from the vial, while the smaller gauge mentioned above is for the purpose of as painless as possible injection.
- Two alcohol pads for the purpose of disinfection and sterility.
- One Band-Aid (or cotton ball with plastic bandage)
The following is the whole steroid injection procedure in steps:
- Wash hands thoroughly with soap and water.
- Inspect all medical equipment for tears, punctures, or defects.
- Open an alcohol swab, and swab the top of the rubber multi-dose vial that is to be withdrawn from.
- Open syringe packaging; remove syringe while taking care not to touch the tip to anything. Do not breathe or blow on to the tip.
- Open needle packaging; remove the 19 – 21g needle while taking care not to touch the opening that is to be screwed onto the syringe to anything. Do not breathe or blow on to opening. With the cap still over the needle, proceed to screw the needle onto the syringe tightly.
- OPTIONAL (IF USING AMPOULES): Swab the top of the ampoule with an alcohol swab, and cut the top of the ampoule with an ampoule opener, or carefully break open the top of the ampoule. Carefully draw up the solution with the syringe.
- With the cap still over the needle, withdraw as much air into the syringe as planned to withdraw (if withdrawing 1mL of solution, then withdraw 1mL of air into the syringe).
- Remove the cap from the needle and plunge the needle into the rubber stopper at a 90 degree angle, and turn the vial directly upside down at a 90 degree angle. Push in all of the air. This is done so that the pressure within the sealed vial will equalize and withdrawing becomes much easier. Following this, slowly withdraw the desired amount of liquid into the syringe. Be sure to keep the needle away from all surfaces at all times other than during the withdrawal. Do not breathe or blow on the needle or on the surface of the rubber stopper.
- Remove the needle from the vial, tap the syringe to expel any air bubbles by allowing them to move to the top and pushing them out (small amounts of air are not a problem) and replace the cap onto the needle, taking care not to breathe on the needle or brush the needle against any surfaces other than the cap.
- Proceed to swab the area of injection with an alcohol pad in a circular motion, making the circular motion increase in size as it widens. Allow at least 15 – 30 seconds for the alcohol to evaporate before inserting the needle (alcohol must be given such amount of time to ensure complete sterilization of bacteria on the surface).
- Remove the 19 to 21g needle tip. Open second needle packaging; remove the 22 to 25g needle while taking care not to touch the opening that is to be screwed onto the syringe to anything. Do not breathe or blow on to opening. With the cap still over the needle, proceed to screw the needle onto the syringe tightly.
- Remove the cap from the needle, taking care not to breathe on or brush the needle against any surfaces other than the cap.
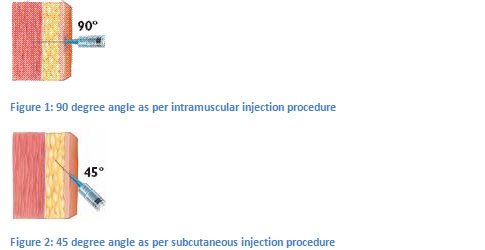
- With the dominant hand, in a swift but steady motion, insert and push the needle into the targeted injection site at a 90 degree angle all the way in.
- VERY IMPORTANT: Aspirate by pulling back on the plunger to ensure that no arteries or veins have been hit/entered by the needle. If the syringe fills with blood, a blood vessel has been hit, and the injection should be re-done (switch to a new needle head, re-swab the injection site, re-inject, and re-aspirate).
- Slowly and steadily inject the liquid into the muscle. The slower the better.
- Withdraw the syringe swiftly but steadily, and place the Band-Aid or cotton ball with tape on the injection site to prevent bleeding or leaking.
How to Inject Steroids – Subcutaneous (SQ) Procedure
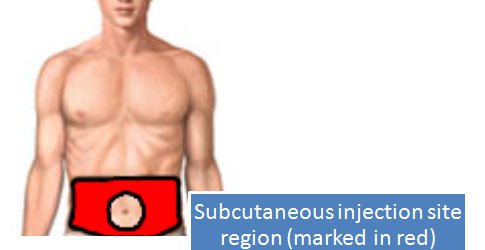
Subcutaneous injections are injections into the fatty tissue underneath the skin, commonly done in the subcutaneous tissue of the abdominal area.
Supplies required:
- 1 insulin syringe.
- 2 alcohol pads for the purpose of disinfection and sterility.
- 1 Band-Aid (or cotton ball with plastic bandage)
The following is the whole steroid injection procedure in steps:
- Swab the top of the multi-dose vial with an alcohol pad. Allow at least 15 – 30 seconds for the alcohol to evaporate before inserting the needle (alcohol must be given such amount of time to ensure complete sterilization of bacteria on the surface).
- Remove the needle cap, taking care not to breathe on or brush the needle against any surfaces. Plunge the needle into the rubber stopper at a 90 degree angle, turn the vial upside down at a 90 degree angle, and withdraw the desired amount of liquid.
- Swab the site of injection with an alcohol pad. Allow at least 15 – 30 seconds for the alcohol to evaporate before inserting the needle (alcohol must be given such amount of time to ensure complete sterilization of bacteria on the surface).
- Pinch the skin at the targeted injection site with one hand to allow ease of access to the subcutaneous tissue and insert the needle swiftly but steadily into the area at a 45 degree angle (slight angle) to the skin so as to ensure the needle is in the subcutaneous tissue beneath the skin and not in any muscle tissue.
- Inject the liquid slowly and steadily into the fat tissue. There is no need to aspirate with subcutaneous injections.
- Withdraw the needle, and release skin with the other hand.
- Use Band-Aid or cotton swab with tape if required.
Where to Inject Steroids – Steroid Injection Sites (Intramuscular and Subcutaneous)
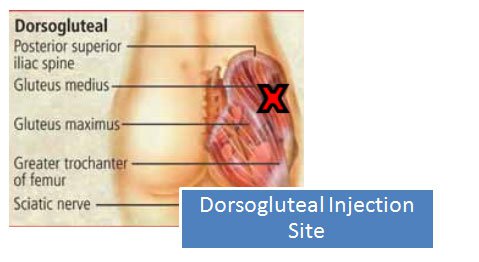
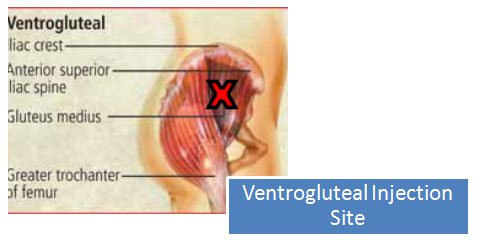
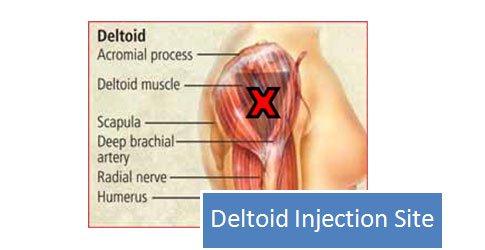
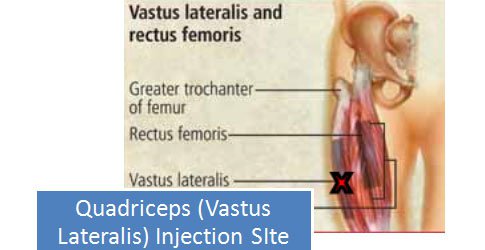
All injection site precise locations are marked with a red X.
Points and tips:
- Visualize the gluteus muscle as split into four imaginary quadrants by a line in the middle of the muscle running up and down vertically, and another line in the middle of the muscle running side to side horizontally.
- Inject into the upper outer quadrant.
Points and tips:
- While standing, locate the greater trochanter.
- Move up one inch from it. The spot should feel fleshy when fingers are pressed into it.
- Can be performed seated or lying down with legs bent as though in a fetal position.
- While seated, one should notice the area becomes a lot ‘meatier’ or softer. This is the spot.
- Additional tip: simulate a karate kick stance to the side. On the leg/side of the body that is in contact with the ground during this stance, look at the ventrogluteal area. While keeping that karate kick stance, the ventrogluteal muscle should be bulging out in this stance. There is the spot.
- Locate the center of the side of the shoulder.
- Locate the middle of the outer side of the leg (thigh).
Final Important Points and Tips on how to inject steroids
- IMPORTANT: intramuscular injection sites should be rotated so as to ensure no muscle is injected more than once every 7 – 14 days.
- Ensure at least 15 – 30 seconds for the alcohol to evaporate after swabbing anything before inserting the needle (alcohol must be given such amount of time to ensure complete sterilization of bacteria on the surface as well as evaporation of the alcohol).
- Ensure to never allow the tip of the exposed needle to touch any surfaces, or to be breathed or blown on. The same is said for the top of the rubber stopper on a multi-dose vial – do not touch, blow, or breathe on the rubber stopper after it has been swabbed with alcohol. The same rule applies to the injection site.
- Optional Z-track method when injecting intramuscularly: Prior to inserting the needle into the injection site, with a free hand stretch the skin around the injection site (not ON the site of injection) to the side about 1” with a couple of fingers. Following this, plunge the needle into the injection site as per usual. After the injection is complete, withdraw the needle and let go of the skin with the other hand, allowing the skin to move back. This is done so as to ensure that the path that the needle had created will be closed off following the injection, and will prevent any possible leaking of the injected liquid if it was not injected deep enough into muscle tissue.
- It might help some individuals to warm up the vial for a few minutes so as to allow the oils to become thinner and more free-flowing.
- Post-injection pain (PIP) in the form of a dull pain for days following the injection is normal. This pain should subside eventually, and the time this takes will vary depending on many different factors. The severity of PIP can depend on: the type of oil used in the product, the concentration of the product, solvents used, co-solvents used, sterilizers in the product, and most importantly: the individual’s own body response and reaction to the liquid itself. If the pain of the injection site the following day is associated with redness, very hot to the touch, tenderness, accompanied with a fever, these are all signs of an infection and the individual should seek medical attention immediately.
- Bumps and lumps associated with PIP are normal, and should subside with time. Additional massaging and/or deep heat application might help.

